Manage the Odontogram
|
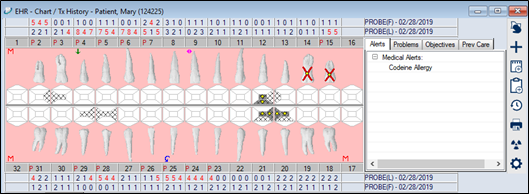
Within the EHR, you can use the odontogram to perform a variety of tasks. The odontogram provides a visual representation of a patient’s mouth and displays planned, in process, and completed treatments, as well as conditions and findings, graphically on the teeth. In addition to displaying teeth, previously charted periodontal values can display above and below the odontogram, and a set of tabs displays on the side, providing information about medical alerts, problems, and other information related to the patient.
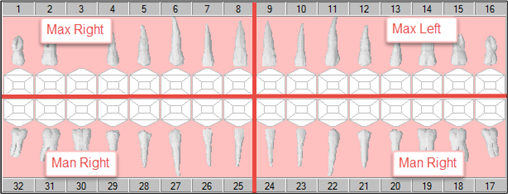
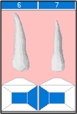
When working with the odontogram, you can select surface(s) on a tooth, multiple teeth, or even the entire mouth. This can save you time, allowing you to perform activities on multiple teeth at once. It can also allow you to filter activities based on your selection. Tooth numbers display as follows:
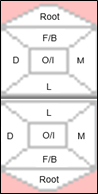
Tooth surfaces are identified as follows:
To select teeth and surfaces:
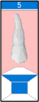
All selected surfaces display in blue.
Note: The root can only be selected when no other tooth surfaces are selected. If you attempt to select an additional surface, the root selection is removed.
Note: If you click the tooth number, the tooth is selected but the surfaces do not display in blue.
Dentition is the arrangement or condition of the teeth in a patient. This includes whether the patient has primary or permanent teeth, missing teeth, etc. When a new patient record is created, axiUm uses the patient’s age to determine whether to display primary or permanent teeth on the odontogram. Later, when you assess the patient’s mouth, you may need to modify the dentition to display a different tooth, as well as indicate missing teeth. To specify dentition:
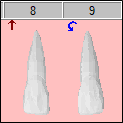
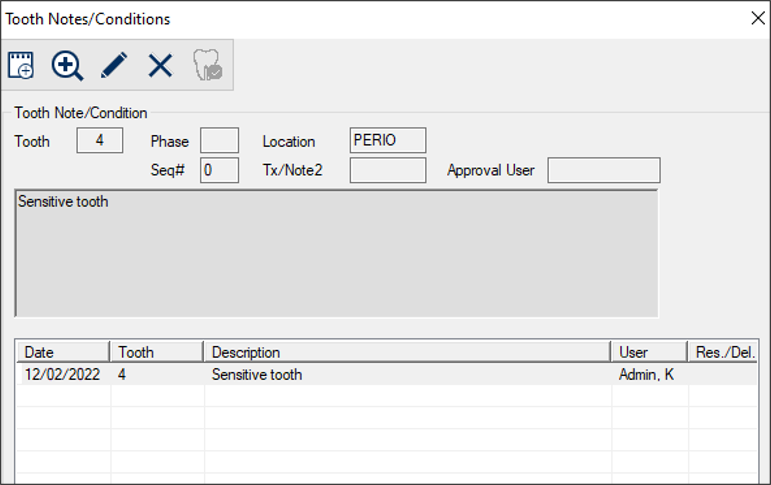
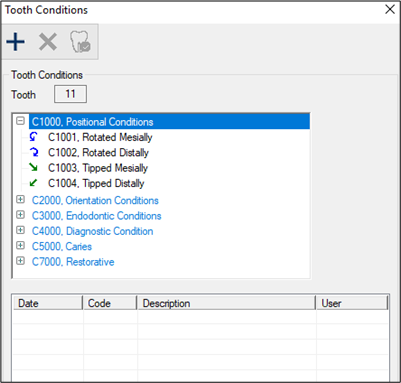
Note: This can only be performed on teeth previously marked as missing, and not on teeth that have been removed from the odontogram through an extraction procedure. When necessary, you can associate notes with specific teeth and record various conditions for teeth. If a condition is added, a symbol displays on the tooth to visually represent the condition. Note: Conditions can be associated with the tooth itself or with surfaces on a tooth. Examples: Tooth 8 is marked as Partially Erupted, and Tooth 9 is Rotated Distally.
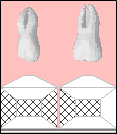
Teeth 1 and 2 are marked with Slight Caries on the selected surfaces of the teeth.
Tip: The symbols used to represent conditions on the teeth/surfaces are configured by your institution and may vary from the configuration shown here. Tooth conditions can be entered from the odontogram or through the Chart Add tab. Tip: You can only add conditions on a single tooth from the odontogram. To add the same condition on multiple teeth or tooth sites, use the Chart Add tab. To manage tooth conditions from the odontogram:
Tip: If any primary or permanent teeth have an associated note, a tooth number displays under the Tooth column.
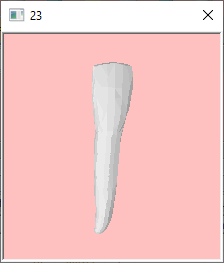
Note: You can also delete conditions or mark as resolved from this window by clicking the Delete Record ( Note: When you enter a note that pertains to a specific tooth, the tooth number displays with an N on the odontogram. The record now displays as struck out. When needed, you can display additional details for a tooth using the odontogram. This may include rotating the tooth or adding color to areas of a tooth. Note: These customizations must be done manually. Example: Indicating that a tooth is rotated distally using tooth conditions does not rotate the image of the tooth on the odontogram; you must physically rotate the tooth on the odontogram. To manage tooth details:
When necessary, you can view a tooth’s colors and position. Note: You cannot make changes from this window.
Note: Your changes will not be saved. Tips: Note: Moving the tooth in this window does not move the tooth on the odontogram. |